Projectors have become quite common these days. Every other office and classroom features a projector. Surprisingly, most people still have no idea how to connect a projector to the laptop. If you are one such person, you do not need to look any further. In this article, we are going to explain how you can display your computer’s image on a big screen by connecting it with a projector.
Against common perception, it is very easy to connect your projector to a computer. You only need to have the right equipment and a bit of common sense to accomplish the task. In this regard, the following are the main items you need for a successful projector installation.
- A projector, of course
- A projection screen
- A projector remote
- A laptop or computer
- A network cable for wireless connection
- A VGA or HDMI cable for wired connection
- A power strip if you don’t have one close to your setup.
Steps to Add a Projector to a Laptop
Once you have gathered all your equipment, it is time to start connecting your projector. Here are the main instructions to follow if you want to deliver your next business presentation or class lecture on a big screen.
1. Turn off Your Projector and Computer
It is imperative for you to turn off your computer and projector before you connect your projector to the laptop. Your equipment can get damaged in case of faulty installation if you leave it turned on.
2. Connect Your Projector to the Laptop
As mentioned above, it is fairly easy to connect your laptop to the projector. In this regard, you must also have a good idea of major connection ports of your projector and the laptop.
- Your projector should have a video port that is compatible with a video port on your computer. Otherwise, you cannot establish a connection between these two devices. Some of the most common video ports are DVI, VGA, HDMI, and DisplayPort (DP). If any of your devices don’t have any of these ports, you may need to change one type of port to another using a video output adapter cable.
- Once you have a compatible video cable, connect your laptop with your projector.
3. Turn On Your Laptop and Projector
You have successfully connected the projector with the laptop. Now, you can turn off the projector by pressing the power button. Similarly, turn on your laptop as well.
4. Using the Projection Screen
The projector will automatically take over from your laptop’s screen and display the image on the projection screen. Talking about projection screens, they come in many different sizes and shapes. For example, you can lower some projection screens by pulling a cord. On the other hand, you simply have to press a button to lower the screen. The choice of the screen actually depends upon your requirements and budget. However, you can simply project the image on a neutral wall as well if you don’t have a projection screen.
5. Install the Latest Version of the Graphic Driver
For the best results and stability, you have to upgrade your laptop’s graphic card to the latest version. However, it is easier said than done. Some people, especially if they are not tech-savvy, find it difficult to find the relevant drivers for their devices. The easiest method to discover the required drivers is to simply write the device name in Google Search and followed by the type of driver you need. For example, if you need a video driver for Dell Inspiron 15 3000, simply search for “Dell Inspiron 15 3000 video drivers” and you will get plenty of options to choose from. Similarly, you can directly explore the manufacturer’s website for your drivers.
Common Settings for Projecting the Image Successfully?
Sometimes, the projector fails to pick the video signal for a number of reasons. For example, your laptop’s video output signal may be inconsistent with your projector’s signal source. Therefore, try to ensure that these two ports are compatible with each other.
For instance, it is necessary for you to convert your projector’s signal source to VGA if you are connecting the projector to the laptop using a VGA cable. It is not difficult to do so either as the projector remote control has all the required buttons. Similarly, you must switch the projector’s signal source to HDMI if you are connecting the two devices using an HDMI cable.
Note: you can always consult the user manual if you are not sure what the function of each key on the remote control is.
If the projector still fails to load the image, follow the instructions given below depending upon your operating system.
For Windows 7 and 8
- Press P while holding the Window button. A new window with all the display options will appear.
- Highlight each option by pressing P and the Window button simultaneously.
- One of the options is “Duplicate” which projects the same image on the projector as well as the laptop’s screen.
- You can also extend the image to the projector to use it as a second monitor by highlighting the “Extend” option. By making the projector as a second monitor, you can actually drag videos or files from your computer monitor to the projection screen.
For Window 10
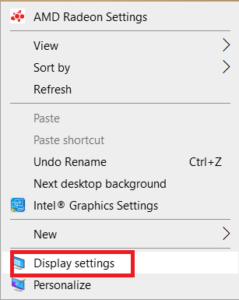
- Right-click anywhere on your desktop.
- Now, select “Display Settings.”
- Go to “Display” on top of the right-hand bar.
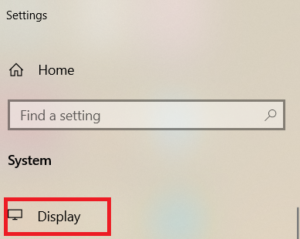
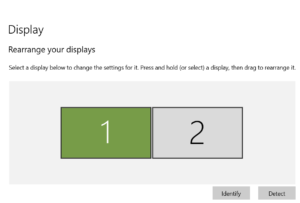
- Now you will get plenty of options ranging from option to change the resolution to identifying and detecting displays and setting the major and primary display.
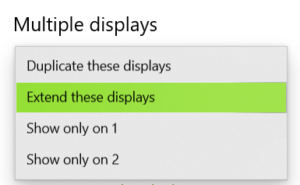
- Go to the bottom of the page and choose “Extend these displays” under the “Multiple Displays” option. Now, you can drag and drop items from your main screen to your projector screen.
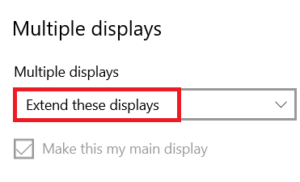
- You can also duplicate the displays if you want both the projector and laptop to display the same image. Similarly, you can show display only on your projector as well.
For Mac OS X Operating System
You do not typically need to manually project the image on the projector. Mac systems have the ability to automatically detect new devices including projectors. However, try to follow these instructions if the image is somehow not available.
- Select “Menu” on the top left of your screen.
- Now, go to “System Preferences.”
- Select “Display” available in the “Hardware” section.
- Now check the “Arrangement” tab.
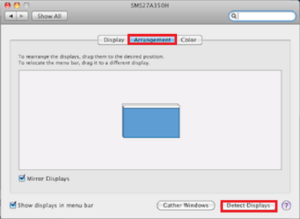
- Click “Detect Displays” and your Mac will detect the projector.
- Click on the “Mirror Displays” in case you want to have the same display on the computer screen and projector.
- The next step is to “Show Displays” and select a resolution of your choice under the LDC Projector option. Most often, you will have to choose a resolution of 1024 x 768.

- Choose “Display Preferences” in Menu if 1024 x 768 is not available. A pane will appear both on your projector and Mac system. Go to the projector pane and set the resolution to 1024 x 768. Be sure to keep the frequency to the minimum.
If you are still unable to project the image, try rebooting your computer or resetting the adapter connection.
You have successfully connected your projector to your laptop. Now it is time to enjoy amazing video quality on a large screen while watching movies or playing games.


Great content! Super high-quality! Keep it up! 🙂
Thanks for the kind words!
Hey there. I found your site via Google whilst looking for a related subject, your website got here up. It seems great. I’ve bookmarked it in my google bookmarks to come back then.
Awesome post. I’m a normal visitor of your website and appreciate you taking the time to maintain the nice site. I’ll be a frequent visitor for a long time.
Magnificent website. Plenty of useful information here.
I am sending it to a few pals ans also sharing in delicious.
And certainly, thank you for your sweat!
Thanks for your kind words Meghan.
Hey there. I discovered your site by the use of Google whilst searching for a comparable topic, your web site came up. It looks good. I’ve bookmarked it in my google bookmarks to visit then.
Good article, like it! Appreciate the patience in putting up such determined content. Thanks for the time and effort.
I read this piece of writing completely regarding
the difference of newest and previous technologies, it’s remarkable article.
Hiya, I am really glad I have found this info. Nowadays bloggers publish just about gossips and internet and this is actually irritating. A good site with interesting content, this is what I need. Thank you for keeping this web site, I’ll be visiting it. Do you do newsletters? Can not find it.
Nice post. I was checking constantly this blog and I am impressed! Very useful info specifically the last part 🙂 I care for such info a lot. I was looking for this particular info for a long time. Thank you and good luck.
Amazing article. Thank you.
Hello it’s me, I am also visiting this web site regularly,
this web site is genuinely nice and the users are in fact sharing fastidious thoughts.
You are a very intelligent person!
I like reading an article that can make men and women think.
Also, many thanks for permitting me to comment!
Great post. I used to be checking continuously this weblog and I’m impressed! Extremely helpful information specially the remaining part 🙂 I handle such information a lot. I used to be looking for this certain info for a long time. Thank you and good luck.
Thanks for your kinds response